When it’s scorching hot, we are all less eager to work in the garden. Unless the girls are swimming, I get a list of heat complaints within five minutes of being outside. Despite the heat, it was time to go spud hunting (potato harvesting). First thing in the morning, after turning off the cartoons, we grabbed our potato fork, bucket, and garden gloves and then headed to the garden.
I garden in three raised beds. In order to maximize my garden, it’s important that I harvest crops when they are ready and then fill that garden space immediately with another vegetable.
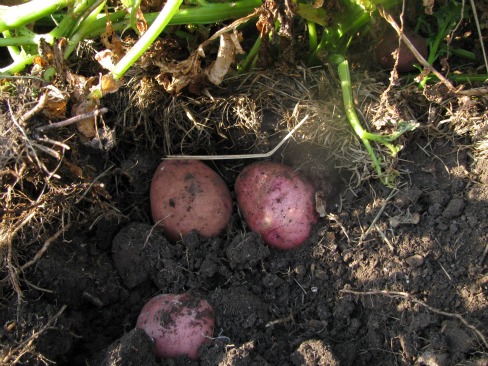
Potatoes are ready to harvest when the plants turn brown and are dead. However, even when the plants are dead you can leave the potatoes in the ground for awhile longer. If you wait too long they will start rotting (yuck). We used the potato fork to lift soil and potatoes out from the underground. If you don’t have a potato fork you can use a shovel or spade. A potato fork looks just like a dinner fork, only larger. It is used to dig potatoes because of the way it breaks up soil and brings potatoes to the soil surface. I carefully insert the potato fork into the soil, being careful not to slice through the potato. That is easy to do, so if that happens, I’ll make sure we eat that one right away.

As the girls were hunting through the soil, they found a few potatoes with green spots. Potatoes exposed to the sun turn green. Green potatoes can make you sick and should not be eaten. After harvesting, we sorted through the potatoes and pulled out the smallest ones. Yum, the small ones are extra delicious. All the planting, watering, and fertilizing has paid off. You know I am a mom wearing a smile as the girls gobble up a plate of new potatoes. It’s satisfying to feed my family healthy, nutritious vegetables from our garden.
We will not be able to eat all of our potatoes at once, so I store them in our basement. I lay them in a ventilated box (a cardboard box with holes). You can store them in boxes, paper bags, or potato sacks; just be sure to store them in a dark cool place. Also if you begin to smell a foul order, do not ignore it. Go through and find the stinky rotting spud. Wash any potatoes that may have touched the rotten potatoes as it can ruin the others.
Back out in the garden, I planted bush green beans where I had just harvested potatoes. When we dug the potatoes out of the ground we removed nutrients that were once in the soil. Before the green beans were planted, I replenished the soil with nutrients by applying a granular fertilizer. I use a 10-10-10 blend. This means that there is ten percent nitrogen, ten percent phosphorous, and ten percent potassium. These are the three macro-nutrients plants need to survive and thrive.
Now we are back out in the heat; watering and waiting for our green beans sprout.
WOW….i was looking for something to help me with the transplanting of my cucumbers I bought from Lowes or Home Depot and I cam across this blog. I am from Wichita too!
My question is…when I purchase the individual “pots” of cucumbers from Lowes, do I break them up to plant each seedling individually, or do I just pull out the whole thing from the pot and plant it all as one big lump?
Welcome to the blog. When purchasing plants in individual pots you plant the entire pot or break them individually. Since cucumbers are a vine and usually planted in a mound, I would probably plant “one big lump.” If you do choose to plant each seedling, carefully break up the soil and gently separate the plants from each other. The roots are the life line to the little seedling – be careful not to break them too much.
In this heat, WATER is key! Good luck and happy gardening!